7 Ways to Fix Windows 10 Automatic Repair, 100% Work!
Windows 10 Automatic Repair is a feature of Windows. Can we fix it? You can! Just follow these 7 tutorials on how to solve Automatic Repair!
7 Cara Mengatasi Windows 10 Automatic Repair, 100% Work! | IT Pro
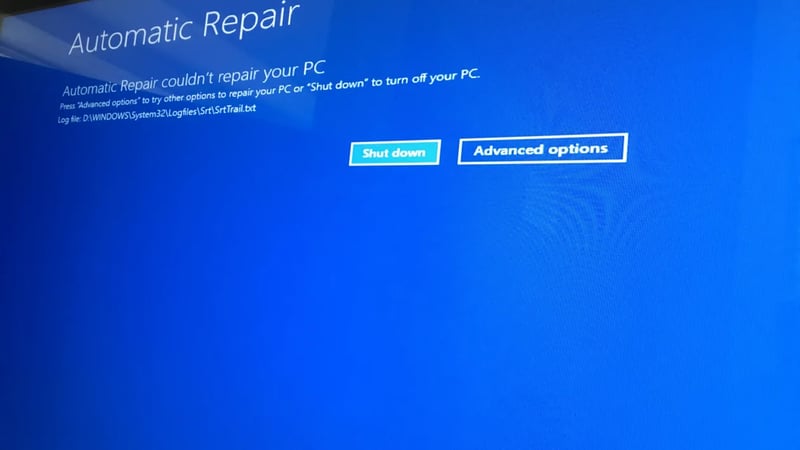
Windows 10 Automatic Repair is all the features of Windows where the mode will appear if your computer or laptop has problems. Examples of the problems themselves can be quite a lot.
Starting from Windows file corruption, your hardware has problems and needs to be replaced, or the most common occurrence of Automatic Repair Windows 10 is because your VGA driver is problematic. However, when Attempting Repair happens, you don’t need to panic.
Also Read:
- How to Drag and Drop in Windows 11 (Bug Fix & Tricks)
- Here’s How to Download Windows 11 for Free
- Here’s How to Enable Dark Mode in Windows 11
7 Ways to Fix Windows 10 Automatic Repair
Because here are 7 ways to solve Automatic Repair Windows 10 specifically for those of you who don’t know how to solve it. Curious about our discussion this time? Let’s jump straight into the tutorial!
1. Using Safe Mode via CMD Command
Buka CMD
Masuk ke Safe Mode Windows 10
.
bcdedit /set {current} safeboot minimal
Keluar dari Safe Mode Windows 10
.
bcdedit /deletevalue {current} safeboot
2. How to Solve Windows 10 Automatic Repair Using SFC
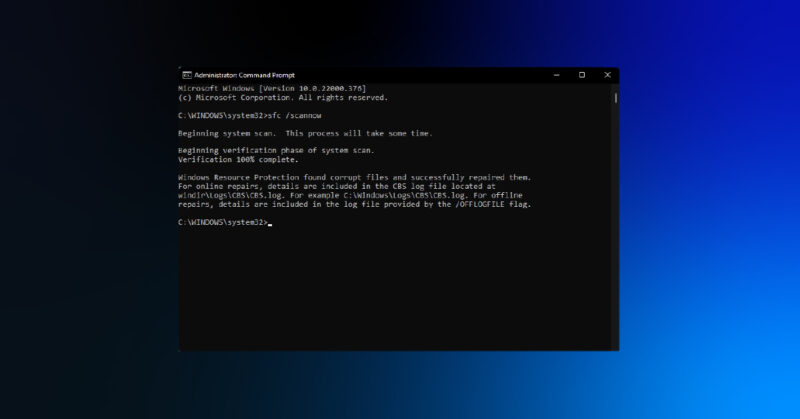
The second way to overcome Automatic Repair is still the same as the first, because here we still use the CMD method. Make sure you follow the directions below carefully for a successful tutorial!
- If you are already in Automatic Repair Windows 10, go to the Troubleshoot menu and select Advanced Options.
- After that, open CMD or Command Prompt and enter the sfc /scannow command then press Enter.
3. How to Fix Windows 10 Automatic Repair Using Fixboot
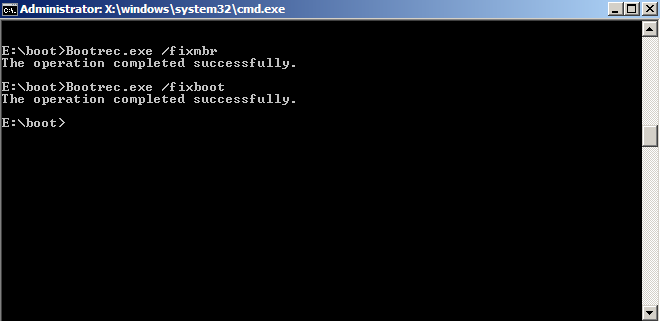
If you still can’t solve Automatic Repair Windows 10 above, you should try this one way if your Windows has problems. You can see the tutorial below.
- Open CMD as previously explained by Teknodaim, then enter the bootrec.exe /fixmbr command and press Enter.
- Next enter the bootrec.exe /fixboot command and press Enter. After that you only need to restart your computer or laptop.
4. How to Solve Windows 10 Automatic Repair Due to Broken Registry
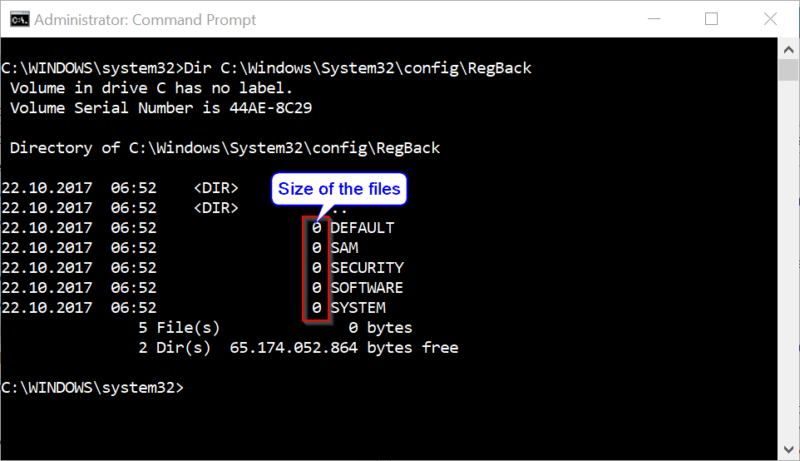
In addition to the above methods, there are also other methods that may rarely be used by people. Because the Registry itself will not be damaged if the user does not download files that contain viruses and the like. Curious about the tutorial? Here it is!
- After entering CMD, type the command below then restart your computer or laptop.
copy c:\windows\system32\config\RegBack* c:\windows\system32\config
5. How to solve Windows 10 Automatic Repair by turning off Anti-Malware-Protection

Anti-Malware-Protection is a feature of Windows 10 that removes suspicious software or files, such as viruses for example. If you previously downloaded something and then Windows 10 Automatic Repair happened, you should do this fifth method.
- While in Advanced Options mode, select Startup Settings and then there will be various features and select Restarts only.
- After following the steps above, the feature will reappear and press 8 to turn off Anti-Malware-Protection.
6. How to Fix Windows 10 Automatic Repair with Reinstallation
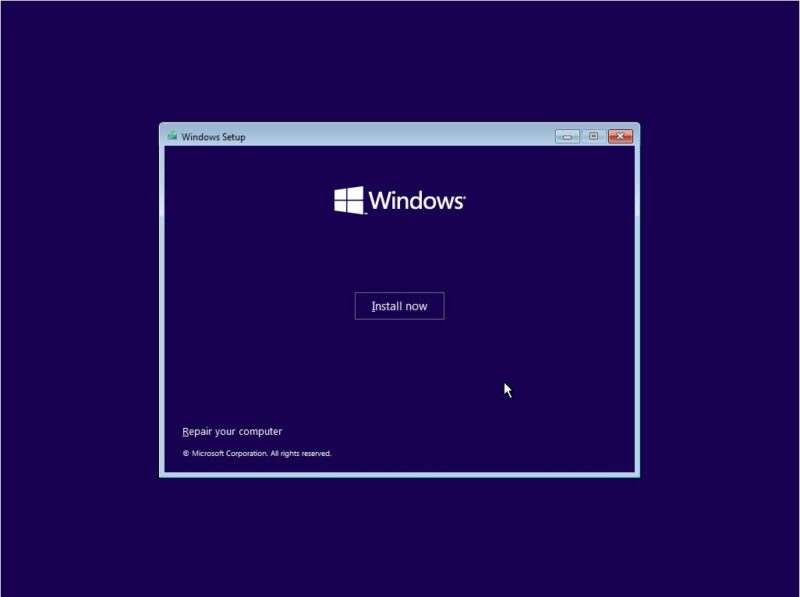
If the above methods still don’t work, most likely your Windows files are damaged and must be reinstalled. How to reinstall Windows itself is very easy, you only need a Flashdisk or just follow the tutorial below.
7. How to Solve Windows 10 Automatic Repair by Removing Hardware
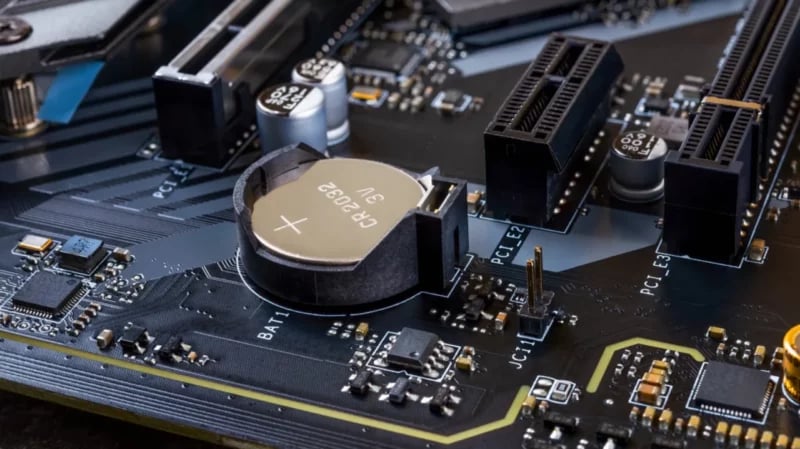
If you are using a computer, unplug the RAM that is plugged into the Motherboard and clean the RAM pins or brass using an eraser. You can also uninstall other hardware, such as Hardisk, SSD or NVME. But usually removing the CMOS battery and then reinstalling it after 5 minutes is the most effective way.
To resolve Attempting Repair on your own laptop is different. You can search YouTube for “how to open a laptop case” to remove the hardware. However, make sure that you watch videos that are suitable for your laptop series!
That was 7 ways to overcome Automatic Repair Windows 10 which of course, there are ways that work or work for your device! If you found this article helpful, don’t hesitate to say so in the comments section!